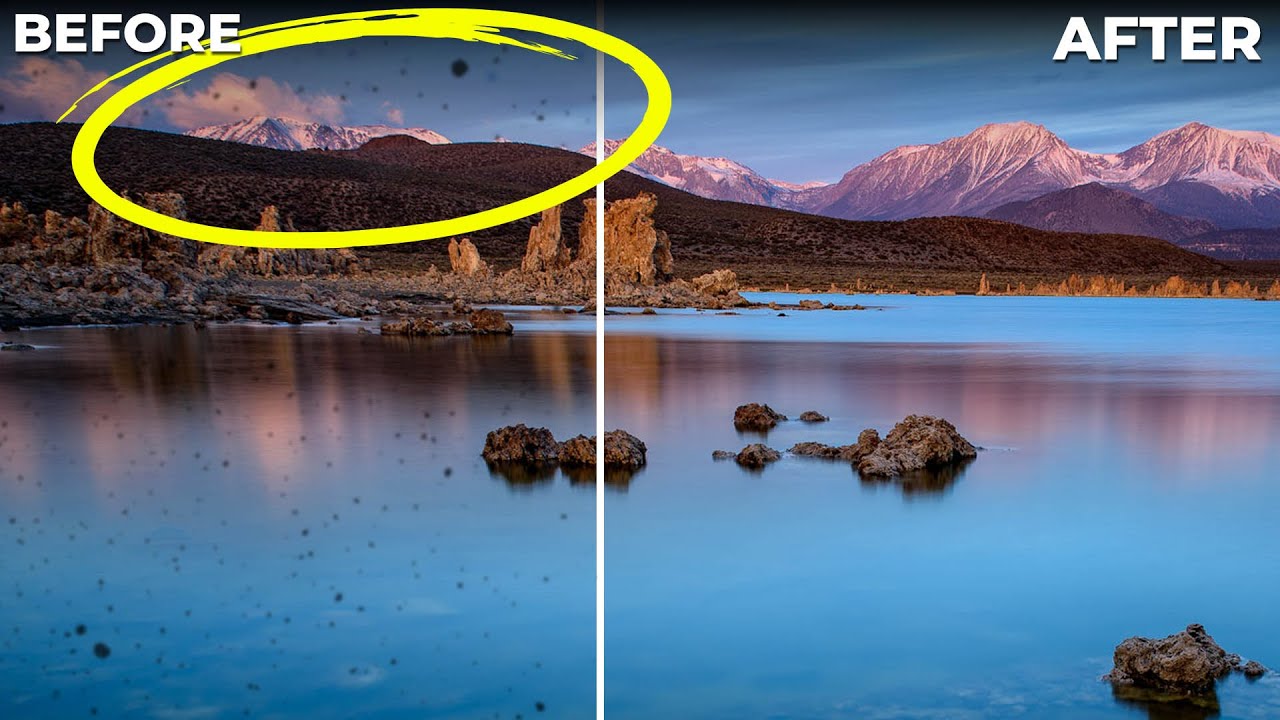
There’s a specific kind of dread that hits when you’ve finished editing a landscape shot, exported it at full resolution, and then noticed a cluster of sensor dust spots scattered across what was supposed to be a clean blue sky. I’ve been there more times than I want to admit. You zoom in, you grab the Spot Healing Brush, and you start playing whack-a-mole with tiny gray blobs for the next 20 minutes. It’s not hard work, but it’s tedious in the worst way, the kind of tedious that makes you question your life choices while you’re sitting at a coffee shop trying to look like a creative professional.
So when I came across Watch the full tutorial on YouTube from Matt Kloskowski covering a new automatic dust removal feature inside Photoshop’s Camera Raw, I paid attention. Matt’s the kind of instructor who cuts straight to what matters, and this feature is genuinely one of those small updates that lands with outsized impact. It’s tucked inside Camera Raw under the “early access” label, which tells you it’s still being refined, but even in its current state it’s already saving me real time on real jobs.
Here’s how it works, step by step.
Step 1: Open Camera Raw (Even If You’re Not Shooting RAW)
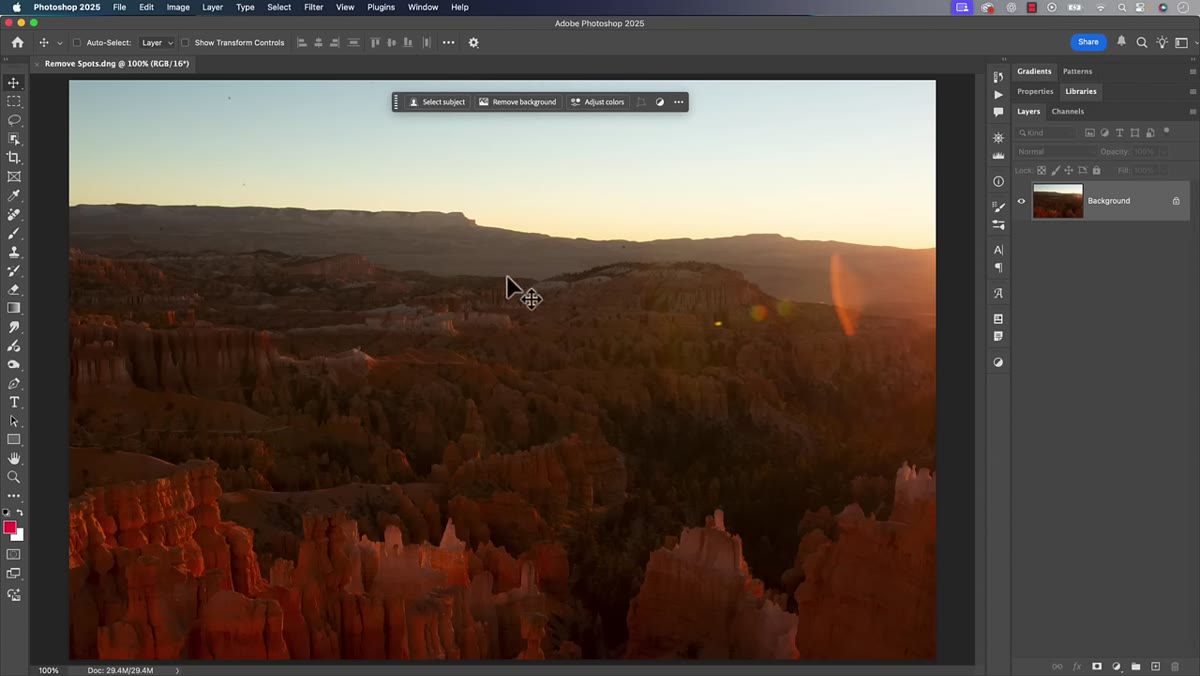 Camera Raw filter option highlighted in Photoshop’s Filter menu
This is the part that trips people up. The dust removal feature lives inside Camera Raw, but you absolutely do not need to be working with a RAW file to use it. If you’ve already got a JPEG or any other file open in Photoshop, just head to Filter in the top menu bar and select Camera Raw Filter. That’s it. Camera Raw will open as a filter panel over your existing image. If you do open a RAW or DNG file directly, Photoshop routes you into Camera Raw automatically, so either path gets you to the same place.
Camera Raw filter option highlighted in Photoshop’s Filter menu
This is the part that trips people up. The dust removal feature lives inside Camera Raw, but you absolutely do not need to be working with a RAW file to use it. If you’ve already got a JPEG or any other file open in Photoshop, just head to Filter in the top menu bar and select Camera Raw Filter. That’s it. Camera Raw will open as a filter panel over your existing image. If you do open a RAW or DNG file directly, Photoshop routes you into Camera Raw automatically, so either path gets you to the same place.
Step 2: Find the Remove Tool (the Eraser Icon)
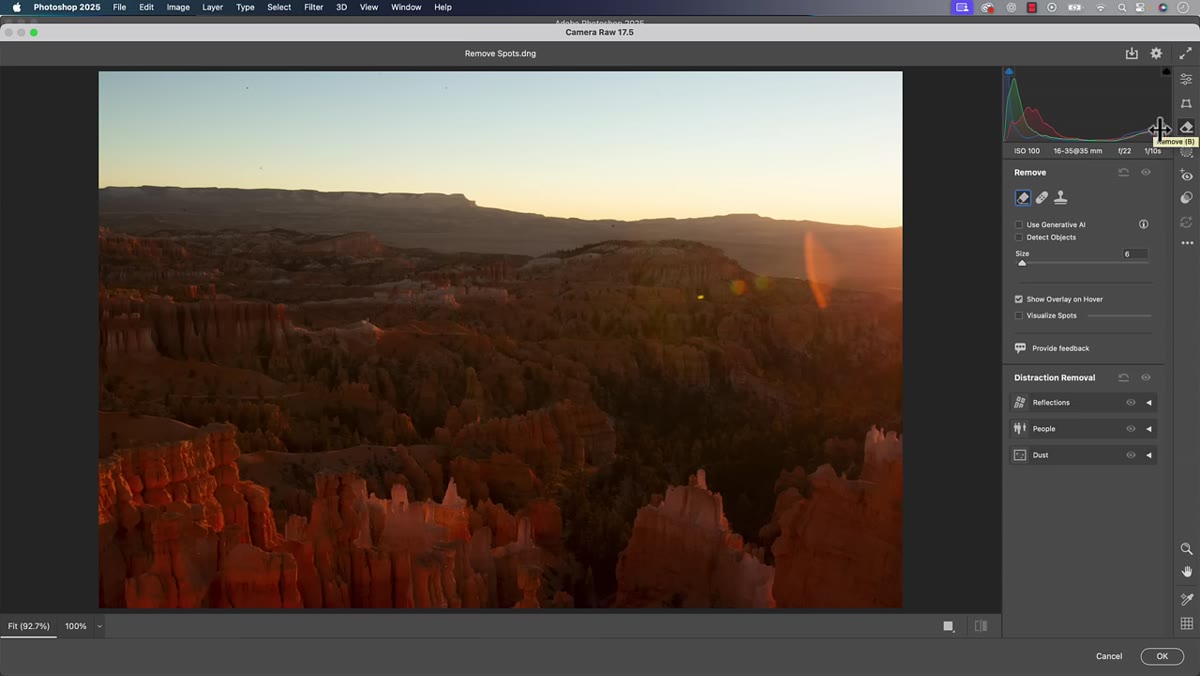 Remove section open in Camera Raw right-hand panel
Once you’re inside Camera Raw, look at the toolbar or panel on the right-hand side for what looks like an eraser icon. Click it and it opens the Remove section. This is the same panel that houses other healing and removal tools in Camera Raw. Toward the bottom of that section you’ll find a new subsection labeled Dust. It’ll likely say “early access” next to it, which is Adobe’s way of saying this is a live experiment. Don’t let that put you off. Early access in Adobe’s world usually means “it works, we just might change how it looks later.”
Remove section open in Camera Raw right-hand panel
Once you’re inside Camera Raw, look at the toolbar or panel on the right-hand side for what looks like an eraser icon. Click it and it opens the Remove section. This is the same panel that houses other healing and removal tools in Camera Raw. Toward the bottom of that section you’ll find a new subsection labeled Dust. It’ll likely say “early access” next to it, which is Adobe’s way of saying this is a live experiment. Don’t let that put you off. Early access in Adobe’s world usually means “it works, we just might change how it looks later.”
Step 3: Zoom In to Check What You’re Working With
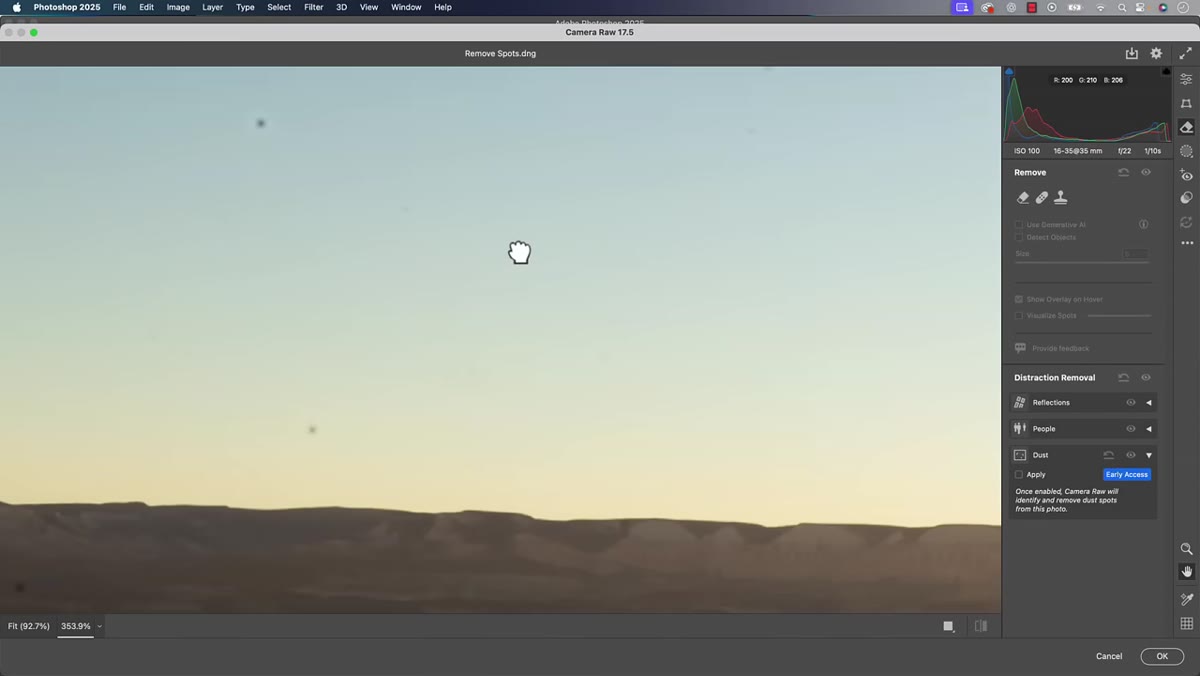 Zoomed-in view showing multiple sensor dust spots across the photo
Before you hit Apply, it’s worth zooming in on your image to get a sense of how bad the contamination actually is. Sensor dust tends to cluster in similar areas across multiple shots if you haven’t cleaned your sensor, so if you’ve got one dusty image, you’ve probably got fifty. Zooming in first gives you a visual baseline so you can compare before and after. In Matt’s example photo, the dust situation was legitimately rough, the kind of thing that happens when you’ve been shooting in dusty conditions and haven’t thought about it until you’re editing.
Zoomed-in view showing multiple sensor dust spots across the photo
Before you hit Apply, it’s worth zooming in on your image to get a sense of how bad the contamination actually is. Sensor dust tends to cluster in similar areas across multiple shots if you haven’t cleaned your sensor, so if you’ve got one dusty image, you’ve probably got fifty. Zooming in first gives you a visual baseline so you can compare before and after. In Matt’s example photo, the dust situation was legitimately rough, the kind of thing that happens when you’ve been shooting in dusty conditions and haven’t thought about it until you’re editing.
Step 4: Click Apply and Let Photoshop Do the Work
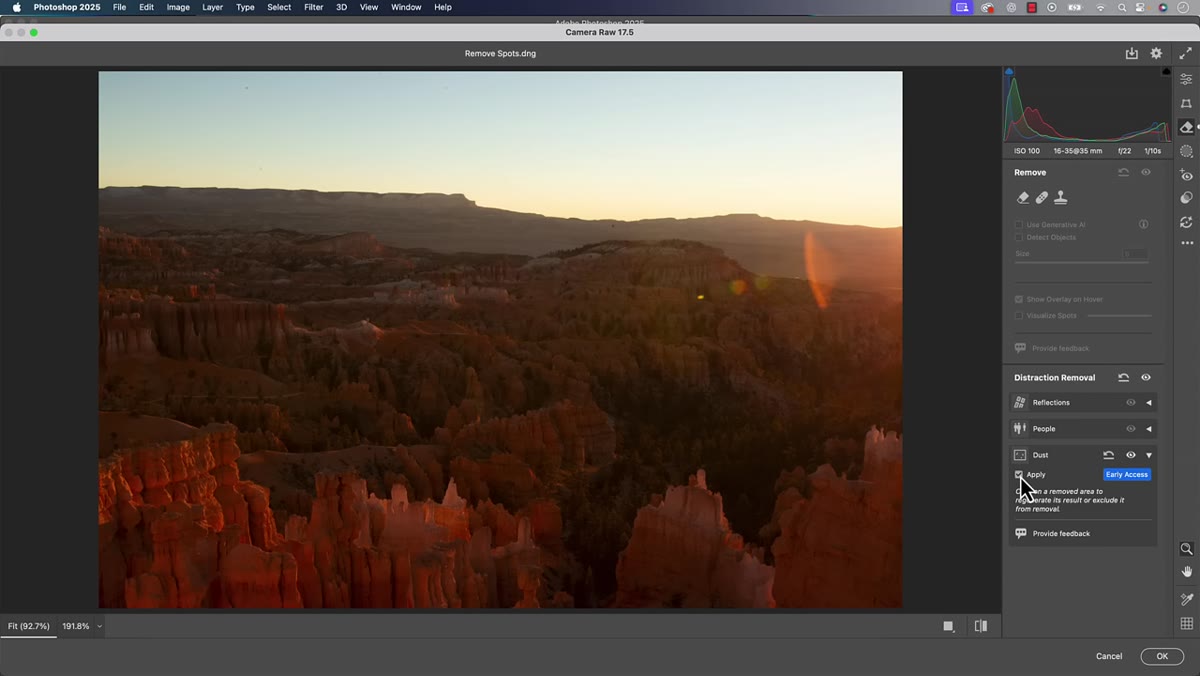 Apply button in the Dust section of the Remove panel
Here’s where the magic happens. Inside the Dust section, there are no sliders to fiddle with, no threshold values to dial in. You just click Apply. Photoshop’s AI goes through the image and identifies all the sensor dust spots automatically. Depending on the size of your file and how many spots there are, this takes a few seconds. When it’s done, you’ll see all the detected spots marked across the image. Hover over the photo and the markers become visible. The tool is doing the hunting for you, which, if you’ve ever spent a chunk of your afternoon manually scrubbing a sky clean, feels like a small miracle.
Apply button in the Dust section of the Remove panel
Here’s where the magic happens. Inside the Dust section, there are no sliders to fiddle with, no threshold values to dial in. You just click Apply. Photoshop’s AI goes through the image and identifies all the sensor dust spots automatically. Depending on the size of your file and how many spots there are, this takes a few seconds. When it’s done, you’ll see all the detected spots marked across the image. Hover over the photo and the markers become visible. The tool is doing the hunting for you, which, if you’ve ever spent a chunk of your afternoon manually scrubbing a sky clean, feels like a small miracle.
Step 5: Review the Results and Handle Anything It Missed
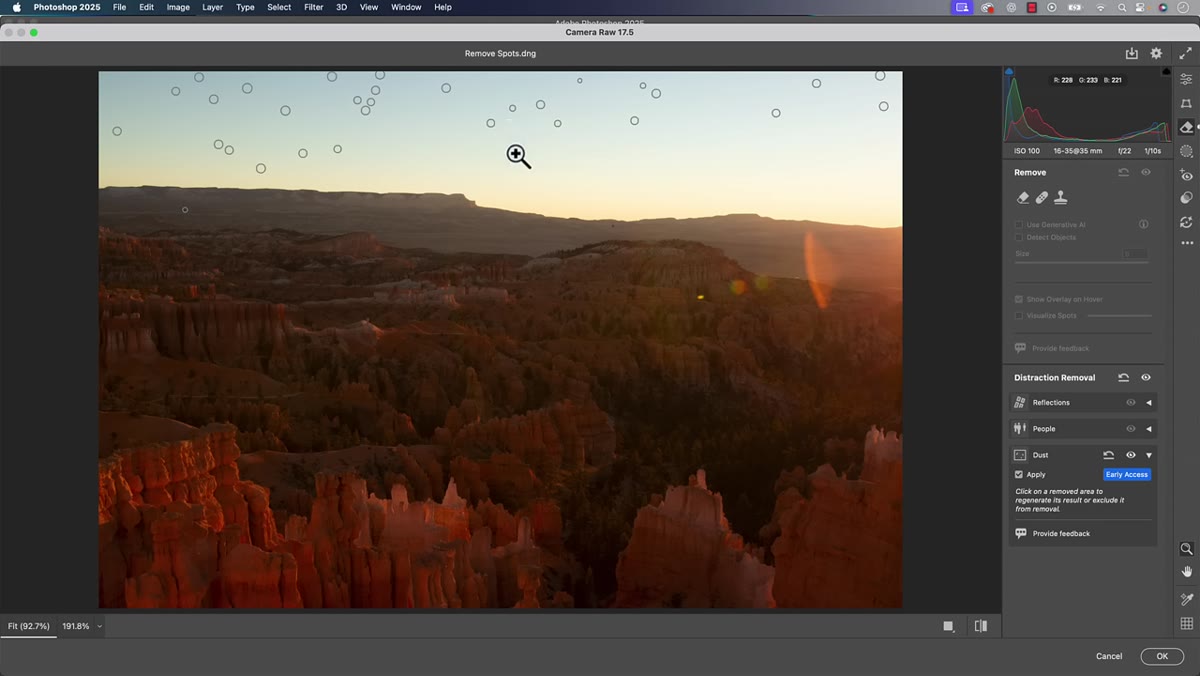 Hovering over detected spots with markers visible across the image
The auto-detection is solid but not infallible. Once the spots are marked, you can click on any individual marker to select that specific correction. At the bottom of the panel you’ll see options for that selected spot, including a Refresh button and a Delete button. If the removal on a particular spot looks off or blotchy, hit Refresh and Camera Raw will take another pass at generating a better fill. If the tool flagged something that isn’t actually a dust spot, hit Delete to remove that correction entirely. You can also manually click on any spots the tool missed and add corrections by hand, so this isn’t a one-shot deal. It’s more like the tool does 90% of the work and you clean up the edges.
Hovering over detected spots with markers visible across the image
The auto-detection is solid but not infallible. Once the spots are marked, you can click on any individual marker to select that specific correction. At the bottom of the panel you’ll see options for that selected spot, including a Refresh button and a Delete button. If the removal on a particular spot looks off or blotchy, hit Refresh and Camera Raw will take another pass at generating a better fill. If the tool flagged something that isn’t actually a dust spot, hit Delete to remove that correction entirely. You can also manually click on any spots the tool missed and add corrections by hand, so this isn’t a one-shot deal. It’s more like the tool does 90% of the work and you clean up the edges.
Why “Early Access” Doesn’t Mean “Skip It”
I’ve noticed a tendency among Photoshop users to ignore features labeled as beta or early access, treating them like half-built furniture you shouldn’t sit on yet. I get the instinct, especially if you’ve been burned by a buggy update mid-project. But Matt makes a point worth internalizing here: Camera Raw has historically functioned as a testing ground where Adobe floats features before they graduate to full Lightroom integration. That means early access in Camera Raw often translates to stable-enough-for-real-work, just not yet finished in terms of UI polish or edge case handling.
The dust removal tool fits that pattern. It’s not going to handle every situation perfectly, especially if your sensor is producing unusually shaped or large spots. But for the common case of small, round, mid-tone dust blobs scattered across a sky or a clean background, it handles the workload fast. The fact that it works on JPEGs and any other file format through the Camera Raw Filter makes it practical for the kind of mixed-format workflows most of us actually run.
The single biggest takeaway here is that the most useful Photoshop features aren’t always the flashy ones. Auto dust removal won’t make it onto a movie poster, but it’s the kind of quiet efficiency tool that compounds across a year of real editing work. Every 20-minute whack-a-mole session it replaces is 20 minutes you get back for something that actually matters.
Watch the full tutorial on YouTube and see the before/after on Matt’s original image. It’s a quick watch and worth it.
Comments
Leave a Comment