
There’s a specific kind of client photo that fills me with quiet dread. You know the one. Shot on a decent camera, decent light, decent composition, but the colors look like they were run through a beige filter. Nothing is technically wrong with it, but nothing pops either. It just sits there, looking fine. Fine doesn’t close clients. Fine doesn’t get shared. Fine is the enemy.
I’ve spent more time than I’d like to admit trying to fix these kinds of photos with increasingly complicated methods, stacking adjustment layers like I’m building a sandwich, wondering why the result still looks flat. Then I came across this Kelvin Designs tutorial on making colors pop in Photoshop, and the approach is refreshingly direct. No plugins, no destructive edits, no twenty-step nonsense. Just smart selections, masked groups, and a curves adjustment that actually does what you want it to do. Watch the full tutorial on YouTube if you want to follow along with the source files. Otherwise, here’s the full breakdown.
The working photo is a portrait, and the goal is to treat different parts of the image, specifically the hair, separately so each element gets its own color treatment. That’s the real insight here: stop treating your photo as one flat object and start thinking about it as regions you can control independently.
Step 1: Open Your Image and Set Up Your Workspace
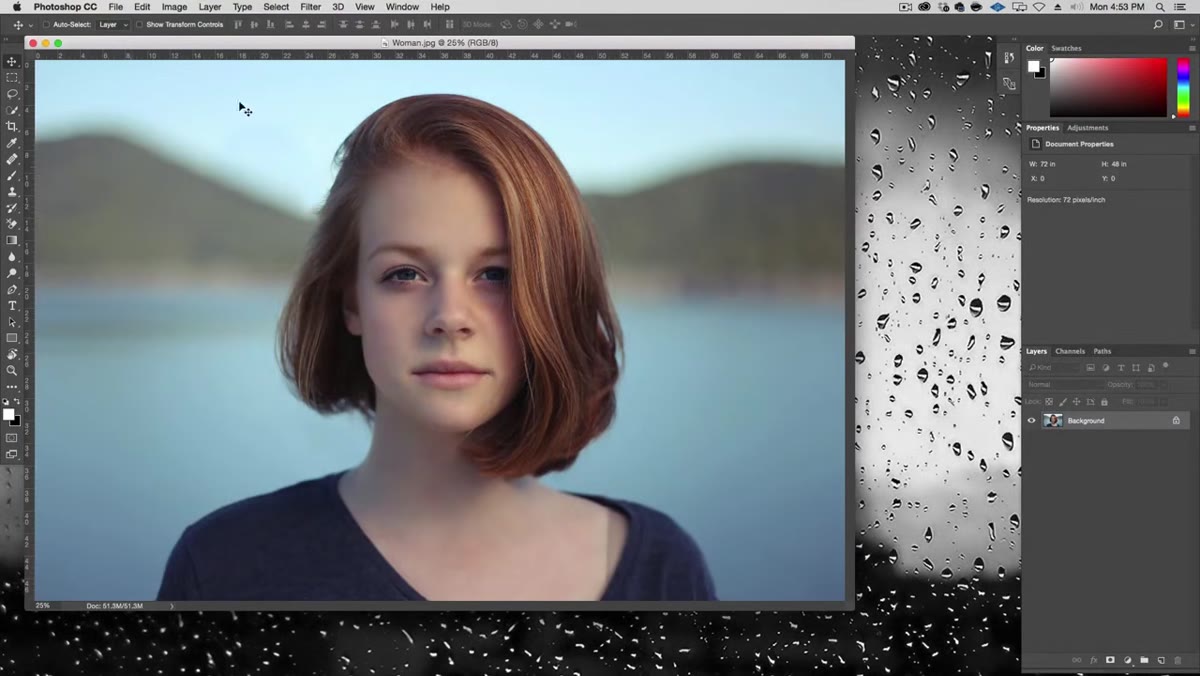 Photoshop workspace with portrait image open, rulers hidden
Start by opening your image in Photoshop. Kelvin is working in the Essentials workspace, which you can select from the workspace switcher in the top right. If your panels look different from any tutorial you’re following, this is usually the culprit. Hiding the rulers (Command/Ctrl + R) keeps things clean and gives you more room to actually see what you’re doing. Small thing, but when you’re zoomed in doing selection work, every pixel of screen space counts.
Photoshop workspace with portrait image open, rulers hidden
Start by opening your image in Photoshop. Kelvin is working in the Essentials workspace, which you can select from the workspace switcher in the top right. If your panels look different from any tutorial you’re following, this is usually the culprit. Hiding the rulers (Command/Ctrl + R) keeps things clean and gives you more room to actually see what you’re doing. Small thing, but when you’re zoomed in doing selection work, every pixel of screen space counts.
Step 2: Make a Rough Selection of the Hair
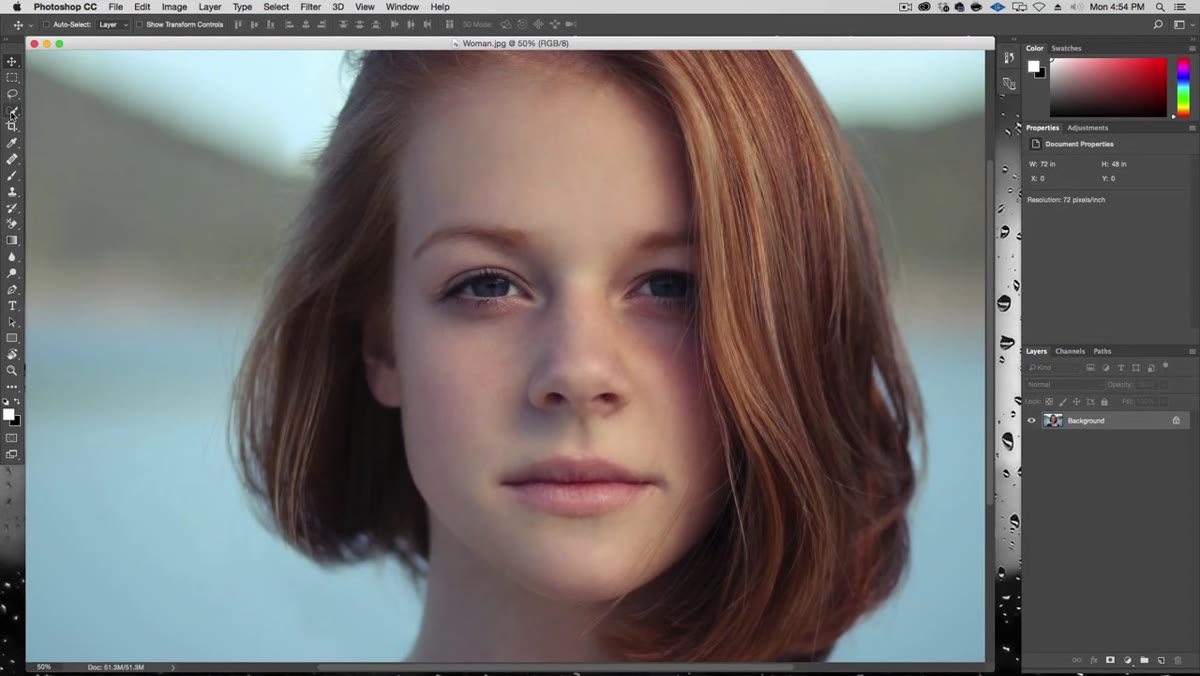 Quick Selection tool active, selection being drawn around hair
Grab the Quick Selection tool and drag it over the hair area. The tool will likely bleed into skin tones because that’s just what it does. Hold Alt and paint back over any skin areas it grabbed to deselect them. The key mindset shift here: this doesn’t need to be a perfect selection. Kelvin is explicit about this. He’s doing color correction, not a background swap, so the edges don’t need to be pixel-perfect. Good enough is genuinely good enough for this use case. Don’t let the pursuit of a flawless selection eat your afternoon.
Quick Selection tool active, selection being drawn around hair
Grab the Quick Selection tool and drag it over the hair area. The tool will likely bleed into skin tones because that’s just what it does. Hold Alt and paint back over any skin areas it grabbed to deselect them. The key mindset shift here: this doesn’t need to be a perfect selection. Kelvin is explicit about this. He’s doing color correction, not a background swap, so the edges don’t need to be pixel-perfect. Good enough is genuinely good enough for this use case. Don’t let the pursuit of a flawless selection eat your afternoon.
Step 3: Refine the Edges Around the Hair
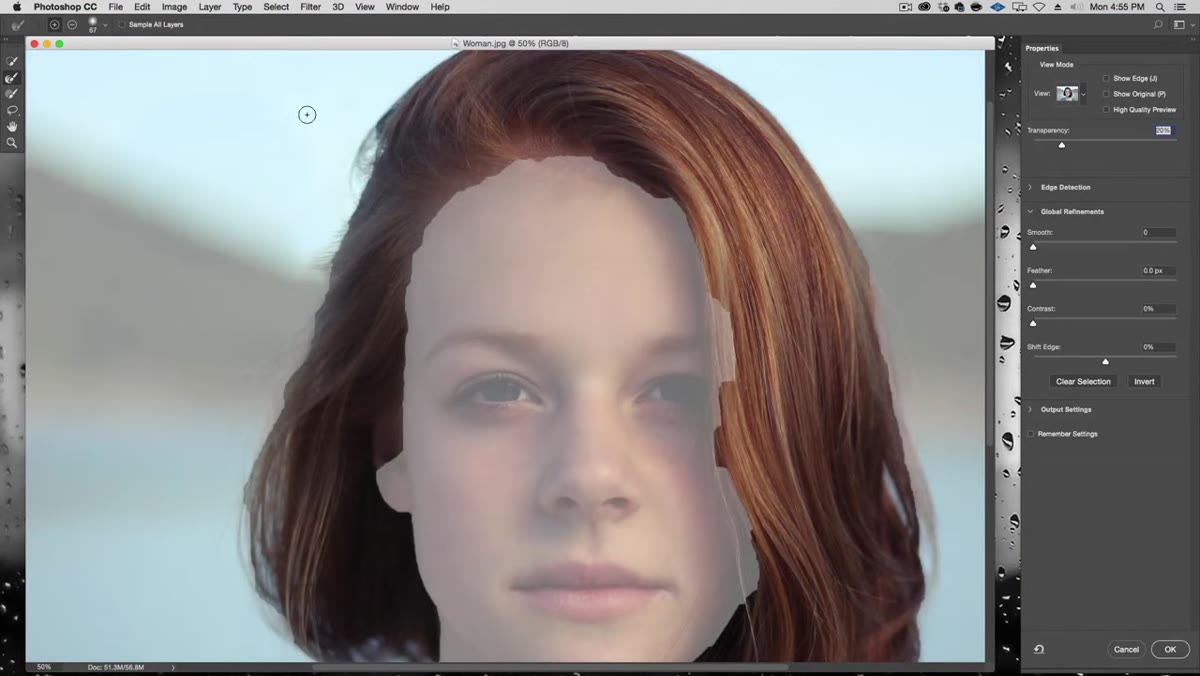 Select and Mask workspace open, Refine Edge brush active on hair
With your rough selection active, click “Select and Mask” in the options bar at the top. This is what used to be called Refine Edge if you’re coming from an older version of Photoshop. Inside this workspace, switch to the Refine Edge Brush tool (second brush icon in the toolbar on the left) and paint along the edges of the hair. Photoshop will analyze those edges and do a much better job detecting the fine strands than your initial drag selection did.
Select and Mask workspace open, Refine Edge brush active on hair
With your rough selection active, click “Select and Mask” in the options bar at the top. This is what used to be called Refine Edge if you’re coming from an older version of Photoshop. Inside this workspace, switch to the Refine Edge Brush tool (second brush icon in the toolbar on the left) and paint along the edges of the hair. Photoshop will analyze those edges and do a much better job detecting the fine strands than your initial drag selection did.
Adjust the brush size with the bracket keys to match the complexity of the edge you’re working on. Finer, tighter areas need a smaller brush. Looser areas with more obvious contrast can handle a bigger one. Where the selection still looks choppy after the refine brush, switch to the regular brush in that workspace to manually add or subtract areas. Hit OK when it looks reasonable.
Step 4: Convert the Selection to a Masked Group
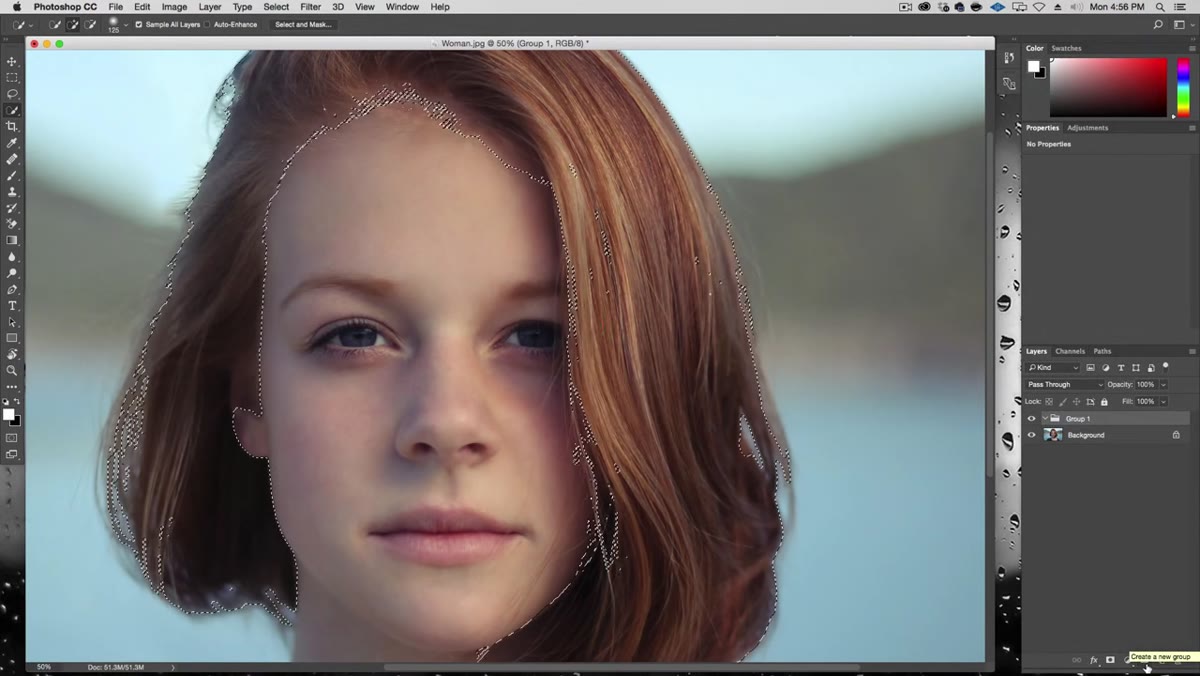 Layers panel showing group with mask applied, named “hair”
Here’s where the technique gets smart. Instead of applying an adjustment layer directly to the selection, Kelvin creates a group first, with the selection active, and then converts that selection into a mask on the group. Name the group something obvious, “hair” works fine. Now any adjustment layer you put inside this group will automatically be constrained to the masked area. This is a much cleaner approach than applying individual masks to each adjustment layer separately. One mask, multiple adjustments, all controlled from one place. This is the kind of workflow decision that makes going back to edit things later not a complete nightmare.
Layers panel showing group with mask applied, named “hair”
Here’s where the technique gets smart. Instead of applying an adjustment layer directly to the selection, Kelvin creates a group first, with the selection active, and then converts that selection into a mask on the group. Name the group something obvious, “hair” works fine. Now any adjustment layer you put inside this group will automatically be constrained to the masked area. This is a much cleaner approach than applying individual masks to each adjustment layer separately. One mask, multiple adjustments, all controlled from one place. This is the kind of workflow decision that makes going back to edit things later not a complete nightmare.
Step 5: Add a Curves Adjustment Layer Inside the Group
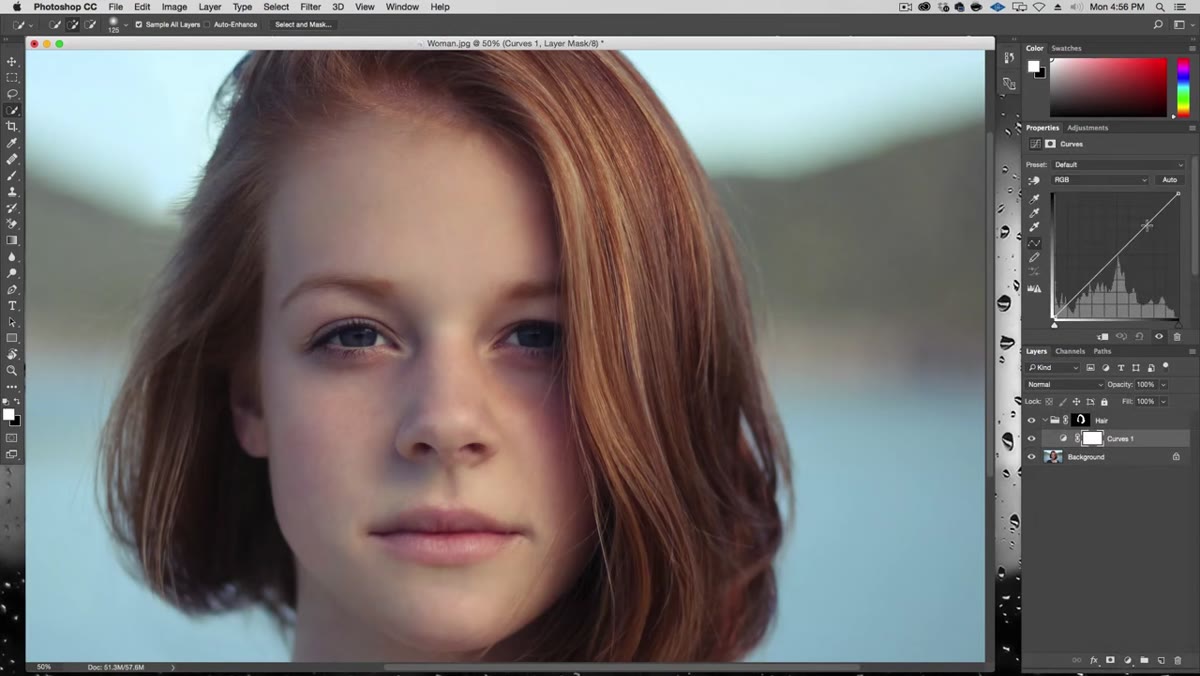 Curves adjustment panel open, S-curve being applied to hair group
With the group selected in the Layers panel, go to Layer, New Adjustment Layer, Curves, and make sure it lands inside the group, not above it. If it appears outside the group in the layer stack, just drag it in.
Curves adjustment panel open, S-curve being applied to hair group
With the group selected in the Layers panel, go to Layer, New Adjustment Layer, Curves, and make sure it lands inside the group, not above it. If it appears outside the group in the layer stack, just drag it in.
Now apply an S-curve to boost contrast. Drag the lower-left anchor point slightly down to deepen the shadows, and drag the upper-right anchor point slightly up to lift the highlights. This creates separation between the tones and gives the hair depth and richness. Quick note on something Kelvin flags: if your Curves panel shows light values in the upper right and dark values in the lower left, that’s the default light-based display. If it looks inverted, he’s working in pigment/ink mode from his print background. Either way, the S-curve logic applies the same, just mirror it if your display is different. You can change this in the Curves panel’s settings if you want to match exactly.
What I’d Add: Don’t Stop at the Hair
This masked group technique is the real takeaway, and I’d push it further than the tutorial covers. Once you’ve done this for the hair, repeat the process for other regions: skin, clothing, background. Build out your layer stack as a series of masked groups, each one targeting a specific part of the image. You end up with a structure that’s easy to revisit, adjust, or hand off to someone else without them needing to reverse-engineer what you did.
I started doing this after spending three days on a composite, only to have a friend point out I could have used grouped masked adjustments for each element from the start and cut that time roughly in half. Lesson learned the expensive way. Now it’s the first thing I set up on any photo that needs real color work, not an afterthought.
One practical tip: label every group and mask as you go. It takes ten seconds. Future you, opening this file at midnight before a deadline, will be genuinely grateful.
The single most important thing this tutorial demonstrates is that treating your image as distinct, independently adjustable regions is what separates a flat correction from something that actually looks finished. Selections and masked groups aren’t just organizational housekeeping. They’re the mechanism that makes precision possible without locking you into destructive edits.
Watch the full tutorial on YouTube to see Kelvin work through the full before-and-after transformation with the source files. The visual difference between the starting image and the final result is the kind of thing that makes the technique click immediately.
Comments (4)
What would you change about this approach for event photography?
Exactly the breakdown I was hoping to find. Appreciate the detail.
Ran through this tutorial twice and my edits are way more consistent now.
Adding this to my workflow has genuinely helped with client satisfaction.
Leave a Comment