There’s a specific kind of frustration that hits when you’re out shooting, you glance at the back of your camera, and the photo looks genuinely great. Rich colors, solid contrast, punchy details. Then you get home, open it in Photoshop Elements, and it looks like a completely different photo. Flat. Dull. Kind of sad. If you shoot in raw mode and you’ve felt this, you’re not imagining things and you’re not doing anything wrong.
The reason this happens is that your camera applies its own internal processing to the JPEG preview it shows you on the LCD screen. When you shoot raw, you’re bypassing all of that baked-in processing. Camera Raw opens your file with its default, neutral interpretation, which is technically accurate but visually underwhelming compared to what your camera showed you. It’s not broken. It’s just missing something. In this KelbyOne tutorial, Matt Kloskowski (co-author of the Photoshop Elements 7 book for digital photographers) walks through exactly how to close that gap using camera profiles inside Camera Raw. Watch the full tutorial on YouTube – and then come back here for the step-by-step breakdown.
This is one of those techniques that seems small until you actually try it. I’ve spent embarrassing amounts of time pushing sliders around in the Basic panel trying to recreate a look that I could have dialed in at the top of my workflow in about four seconds. Camera profiles are that shortcut. Here’s how to use them.
Step 1: Open Your Raw File in Camera Raw
 Camera Raw interface open with a raw photo loaded
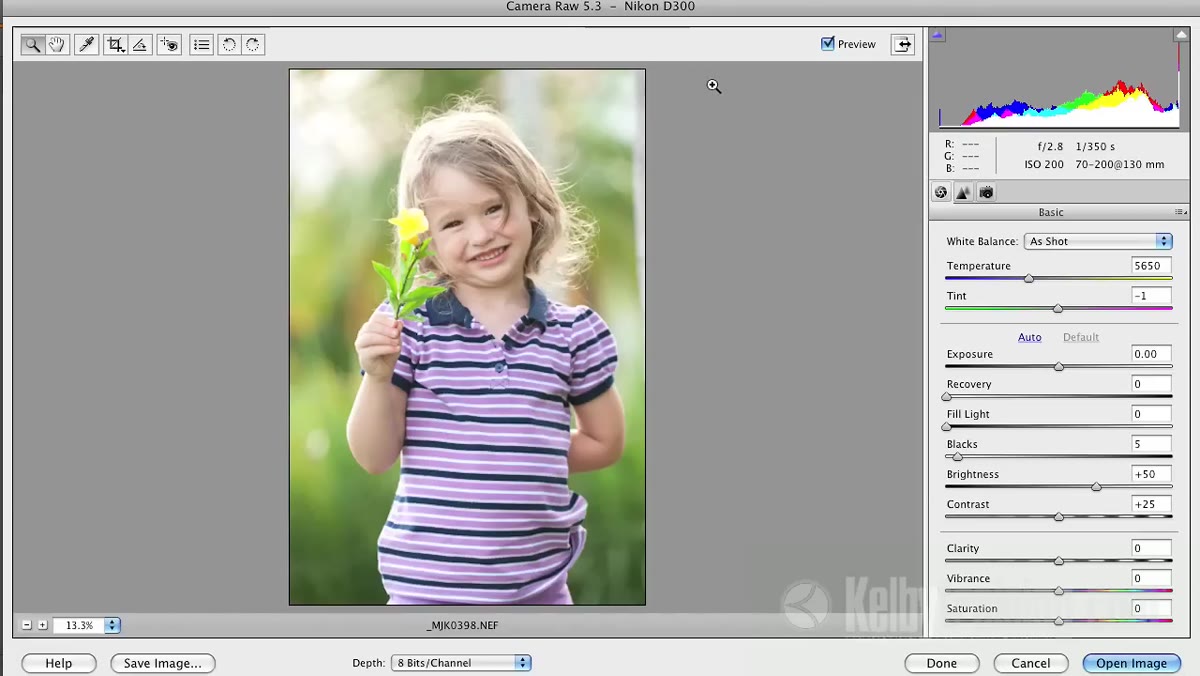
Before anything else, you need to be working with a raw file. Camera profiles are not available for JPEGs because the processing is already baked into those files at the point of capture. Open your raw image in Photoshop Elements and Camera Raw will launch automatically. You’ll land on the Basic panel by default, which is where most people spend all their time, but resist the urge to start dragging sliders.
Camera Raw interface open with a raw photo loaded
Before anything else, you need to be working with a raw file. Camera profiles are not available for JPEGs because the processing is already baked into those files at the point of capture. Open your raw image in Photoshop Elements and Camera Raw will launch automatically. You’ll land on the Basic panel by default, which is where most people spend all their time, but resist the urge to start dragging sliders.
The key insight from this tutorial is that camera profiles should come before any other adjustment. The profile changes how Camera Raw fundamentally interprets and reads the raw data, so any slider work you do before selecting a profile might need to be redone after. Get the profile right first, then refine with sliders.
Step 2: Find the Camera Profile Dropdown
 Camera Raw panel showing the profile dropdown list
Camera profiles live in the Camera Calibration panel in Camera Raw. It’s the last tab along the top row of panel icons – the one that looks like a small camera. Click into it and you’ll see a “Camera Profile” dropdown near the top. By default, this is set to “Adobe Standard,” which is Camera Raw’s generic, flat starting point.
Camera Raw panel showing the profile dropdown list
Camera profiles live in the Camera Calibration panel in Camera Raw. It’s the last tab along the top row of panel icons – the one that looks like a small camera. Click into it and you’ll see a “Camera Profile” dropdown near the top. By default, this is set to “Adobe Standard,” which is Camera Raw’s generic, flat starting point.
This is where most photographers stop looking, which is a shame. Adobe Standard isn’t bad – it’s just neutral to the point of being boring. It’s a blank canvas when most of us would rather start with a sketch already on it.
Step 3: Choose a Profile That Matches Your Camera Brand
 Profile dropdown open showing Nikon camera profile options
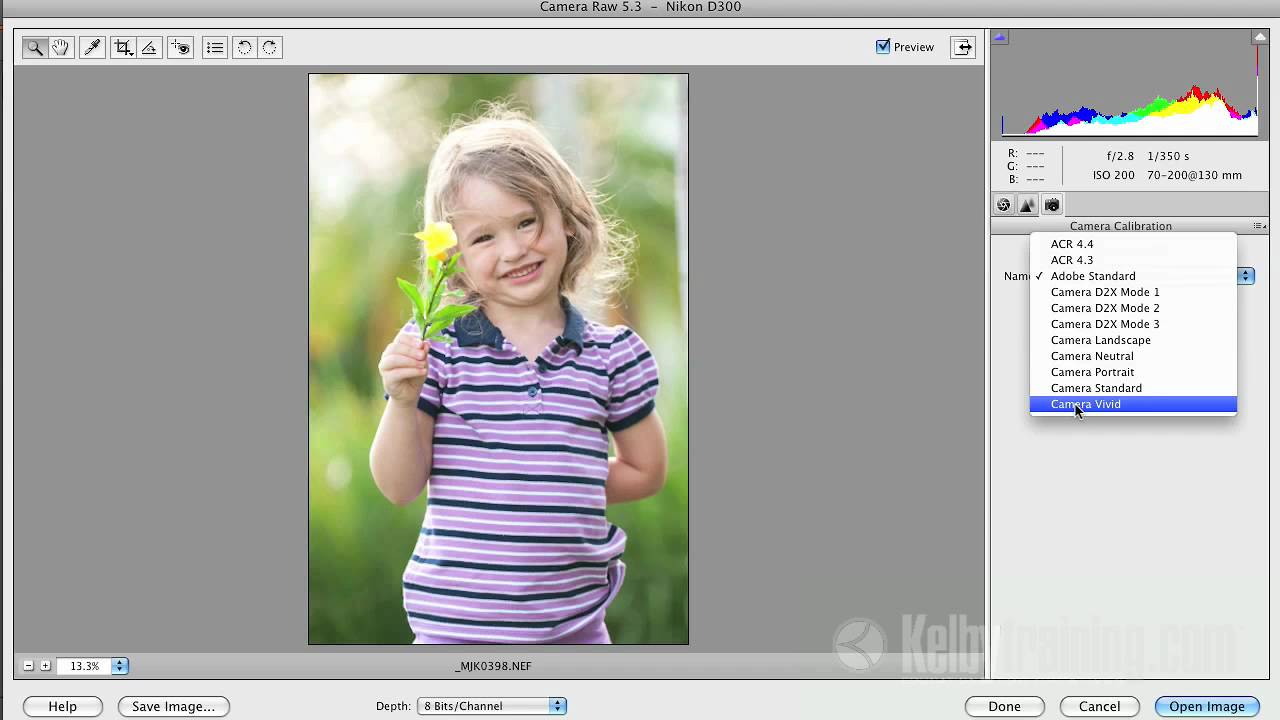
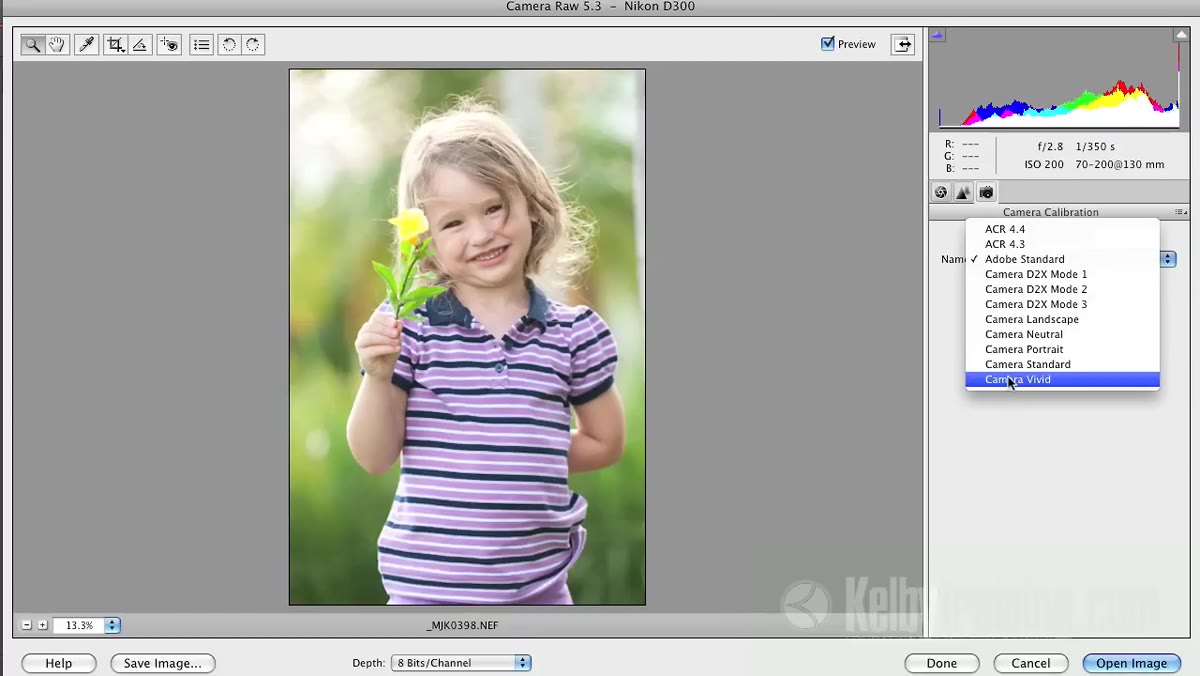
Click the dropdown and you’ll see a list of profiles specific to your camera brand. If you shoot Nikon, you’ll see options like Camera Vivid, Camera Landscape, Camera Portrait, and Camera Neutral – these mirror the Picture Control settings available inside the camera itself. Canon shooters will see a different set of options reflecting Canon’s Picture Style naming conventions. The list is tied to your camera’s EXIF data, so you’re only seeing profiles that actually apply to the body you shot with.
Profile dropdown open showing Nikon camera profile options
Click the dropdown and you’ll see a list of profiles specific to your camera brand. If you shoot Nikon, you’ll see options like Camera Vivid, Camera Landscape, Camera Portrait, and Camera Neutral – these mirror the Picture Control settings available inside the camera itself. Canon shooters will see a different set of options reflecting Canon’s Picture Style naming conventions. The list is tied to your camera’s EXIF data, so you’re only seeing profiles that actually apply to the body you shot with.
Adobe has reverse-engineered and simulated these manufacturer profiles, so selecting “Camera Vivid” in Camera Raw is as close as you’re going to get to shooting with the Vivid picture control active in-camera. It’s not pixel-perfect identical, but it’s a dramatically better starting point than Adobe Standard.
Step 4: Compare Profiles Using the Preview
 Before and after preview showing Camera Vivid applied
Click through the profile options one at a time and watch the preview image update in real time. The difference can be significant. Camera Vivid will boost color saturation and punch up contrast. Camera Landscape is similar but often shifts greens and blues in a way that works well for outdoor scenes. Camera Portrait does something subtler and genuinely useful – it softens the handling of skin tones and pulls back highlights just slightly, which tends to be flattering on faces without requiring any manual work.
Before and after preview showing Camera Vivid applied
Click through the profile options one at a time and watch the preview image update in real time. The difference can be significant. Camera Vivid will boost color saturation and punch up contrast. Camera Landscape is similar but often shifts greens and blues in a way that works well for outdoor scenes. Camera Portrait does something subtler and genuinely useful – it softens the handling of skin tones and pulls back highlights just slightly, which tends to be flattering on faces without requiring any manual work.
The before and after comparison is the fastest way to make the call. Toggle between Adobe Standard and your chosen profile by clicking back and forth in the dropdown. Trust your eyes here. You’re not looking for the most dramatic change – you’re looking for the one that matches what you remembered seeing on the back of your camera.
Step 5: Lock In Your Profile and Move to Basic Adjustments
 Basic panel open after profile selected, sliders being adjusted
Once you’ve settled on a profile, switch back to the Basic panel and do your regular slider work. The important thing to notice is that none of your Basic panel settings have changed. The profile isn’t moving your Exposure, Contrast, or Saturation sliders – it’s changing how the underlying raw data is rendered. This means you’re starting your slider adjustments from a better visual baseline, not from zero.
Basic panel open after profile selected, sliders being adjusted
Once you’ve settled on a profile, switch back to the Basic panel and do your regular slider work. The important thing to notice is that none of your Basic panel settings have changed. The profile isn’t moving your Exposure, Contrast, or Saturation sliders – it’s changing how the underlying raw data is rendered. This means you’re starting your slider adjustments from a better visual baseline, not from zero.
In the tutorial, Kloskowski demonstrates this with a landscape shot. After selecting Camera Vivid, he only needs minor tweaks: a small bump to Blacks, a touch of Contrast, some Recovery pulled in for the highlights, and a slight warming of the white balance. The photo gets to “done” faster because the profile handled the heavy lifting that he used to try to fake with Vibrance and Saturation.
My Take: Make This Your First Move Every Time
I’ve started treating camera profile selection like a preflight check – it happens before anything else, without exception. The practical habit I’ve built is this: open the raw file, immediately navigate to Camera Calibration, select a profile, and only then look at the image with fresh eyes to decide what the sliders actually need to do.
For outdoor and travel work, I almost always land on Camera Vivid or Camera Landscape. For any shot with people in it, Camera Portrait is worth trying first even if the scene isn’t technically a portrait. The skin tone handling alone has saved me time on color correction that I used to spend manually. One thing to note – if you’re shooting with a mirrorless body or a newer camera model and you don’t see brand-specific profiles, you may only have Adobe Standard plus a few generic options. Adobe adds support for new cameras over time, so keeping Elements updated is worth doing for this feature alone.
The single biggest takeaway here is simple: your raw file isn’t broken when it looks flat out of the camera – it just hasn’t been told which interpretation to use yet. Camera profiles are how you tell it. Pick the right one before you touch a single slider and you’ll spend less time compensating and more time finishing.
Watch the full tutorial on YouTube to see the before and after comparisons in motion – the live preview toggle is genuinely convincing in a way that screenshots can’t fully capture.
Comments (2)
The before and after really sells it. Incredible difference.
Excellent tutorial. I'd add that from a color grading standpoint, this technique is incredibly versatile.
Leave a Comment